Wednesday, November 11, 2015

Firebase and those useful little things

In this blog, I'm attempting to write about useful features and tools that Firebase provides. These could make your job easy and some might even have a use case for you.
Open Data sets

Firebase provides open data sets that have read access to everyone. Live information is served for Airport delays across major cities in the US, crypto currencies like bit coins data, earthquake data, real time transit vehicle location data for many cities in the US, weather data and even parking fares and availability of parking slots in SFO city. 
One could see these as a demonstration of quality of Firebase service and validate real world scenarios. They also provide utility value for a Website or a mobile app. It's documented at this link 

Consider following code that reports airport delays at SFO using Firebase open data set and AngularJS


Vulcan - Chrome extension

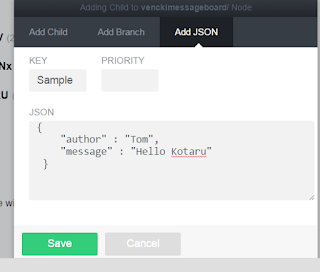
Vulcan is a Google Chrome extension to view and edit Firebase data. (Link to the extension). Even though most of viewing and editing could be done by opening the Firebase application in a browser, Vulcan makes it easy to add and edit JSON node to your dataset.

Firebase Tools - Bootstrap

Bootstrap option in Firebase tools allow you to create a template or sample app on your machine. It provides all nuts and bolts for the app already. You could keep required features, enhance them and yank any unnecessary code. Follow below steps create a skeleton project

1. Install Firebase Tools
npm install -g firebase-tools

2. Run bootstrap
firebase bootstrap

3. It will ask couple of questions like, which Firebase app would you point to and chose from list of available template projects. Refer to the list below. After making the selection template project is created in a folder at the current directory.

Note: will ask you to authenticate using Firebase credentials if you are not already logged in.
----------------------------------------------------
Available Templates
----------------------------------------------------
angular     - The AngularFire seed template
backbone    - Example to-do app using BackFire
chat        - A realtime multi-person chat client with JavaScript, HTML, and CSS

drawing     - Share a canvas and collaboratively draw with other users
firechat    - A more fully-featured chat widget using Firechat
firepad     - Collaborative text editing with Firepad
ionic       - A small chatroom application written for Ionic
leaderboard - A leaderboard which keeps track of high scores in realtime
presence    - Show who is available, who is idle, and who is gone
react       - Example to-do app using ReactFire
tetris      - Play head-to-head Tetris in your browser

Firebase Hosting

If you have static content files that potentially retrieve and update data to Firebase can be deployed to Firebase Hosting service. (need not necessarily interface with Firebase)

To do so, CD into the directory with HTML pages and run, firebase init
It will prompt you to point to the Firebase app in your profile. Once done downloads firebase.json with details of configuration.

You could run firebase deploy anytime later. that will upload files to firebase hosting service. URL to access the static files is shown on the app card on Firebase dashboard. (refer to the screenshot here)

Note: will ask you to authenticate using Firebase credentials if you are not already logged in.

These are some of the many Firebase features and tools. Hope these provide value while developing with Firebase and make it more exciting. Happy coding.

Wednesday, October 28, 2015

Highlights: Firebase, Parse & Azure Mobile Services

Cloud back-end services are revolutionary in quick application development. It takes care of routine code. Many times we write services that act as pass through between UI and data store. Consider two tier architecture with cloud back-end services; Your HTML page or mobile app is directly interacting with cloud back-end. More often than not you don't need to develop middle tier. The back end service acts as one.

In this blog I'm attempting write about Firebase, Parse and Azure Mobile Services.

  • It's quite easy to integrate C.R.U.D operations in your application using any of these services. 
  • They are "cloud" based, so **no** data center or server setup required. They are all ready to hit the ground running.
  • This approach is quite useful for mobile app developers who don't have to setup servers around the world to support their user base. Lot of logic can be written client side and these services provide effective data store and related services.
  • All of them have user services and authentication related features.

Which additional features each of these back-end services provide? Let's find out.

Firebase Highlights


  • Late last year (2014) Google acquired Firebase, a promising back-end service. 
  • Firebase data has no schema. Data is represented as JSON objects. Each node or element in the JSON object has it's own URL. So if you need to reference a child node in your code, can do so by directly referencing it's URL.
  • Firebase has API for Android, iOS, Web (JavaScript) and REST API. These are many ways in which your code can interact with Firebase.
  • Firebase clients are always synchronized. It's a huge. You don't have to write code push message or data changes to the client (or poll from the client). As and when data is modified in the back-end, changes are pushed to all of it's clients.
  • It fits naturally with AngularJS. If you are an ng developer you are in luck :)

Here is one of my earlier blogs on Firebase


Firebase

Parse Highlights


  • Parse was acquired by Facebook in 2013. They provide back-end services for mobile and web applications.
  • Cloud core provides data storage. It too is schema less. But Parse makes it explicit on how to deal with relational data. Refer to this link.
  • Parse Cloud Functions allow adding additional logic on Parse server side. You could add additional validations, send push notifications etc (on server side).
  • Parse push is a very useful feature. It allows sending push notifications to multiple mobile platforms Android and iOS. You can preview notification, schedule it personalized for the user. For example a notification scheduled for 11 AM in the morning in U.S. wouldn't wake up customer in India middle of the night. Rather personalizes to send it at 11 AM India time.
  • JavaScript perspective Parse fits naturally with backbone style of coding. It supports huge list of technologies and platforms. Refer to the image for list.
  • Finally Parse features Core and Push could be used independently. You don't need to be using Core to use Push and vice versa.
A link to my earlier blog on Parse

Azure Mobile Services Highlights

It's little tricky to include Azure Mobile Services in this list. It's one of many features and services Microsoft Azure provides. I believe it fits in the category of Parse and Firebase as it provides lot of out of box features for faster development and integration of back-end services.

  • Schema: Azure Mobile Services by default uses MS SQL Server for data storage. As it's possibly using code first, you don't have to define columns (schema). They are effectively created on the fly. 
  • Unlike other back-end services, with Azure Mobile Services you can chose data storage from SQL Server, Mongo DB and Azure Storage
  • You have a choice for backend technology as well between .net and JavaScript (NodeJS)
  • Similar to Parse Cloud Functions Azure Mobile Services allow adding additional code on server side. In Azure Management Portal, select your Azure Mobile Services, go to data tab, select the table and select Script tab. Use drop down to modify script for add or update or retrieve or delete operations.
  • Azure Mobile Services provide Push Notifications across mobile platforms Windows, Android and iOS. It integrates with MPNS (Windows),  APN (iOS) and GCM (Android) services for push notifications.
  • Azure Mobile Services have APIs for following platforms,


Here are my earlier blogs on Azure Mobile Services, Mongo DB with Azure Mobile Service, Push Notifications for Phone App using Azure Mobile Services and Windows Azure Mobile Services for Connected Apps

In conclusion one of the biggest advantages of cloud back-end services is time to develop. They reduce lot of routine code and provides features out of box. 

Sunday, October 4, 2015

Ionic Framework: What's coming next?

Image Reference: http://www.southbaymobileusergroup.com
In this blog I'm attempting to write about some of Ionic's upcoming features and services. These are mostly in Alpha/Beta stages of development. I believe these features are going to make Hybrid Mobile App development sophisticated, easier and fun.
If you are new to Ionic Framework, checkout docs on it's Website or One of my old blog.

Following are some of Ionic Framework's upcoming features and services.

Ionic IO: 

Ionic IO provides bunch of services for Ionic developers and customers. Features include 
  • Analytics on your app.
  • Ionic Push for push notifications to mobile devices.
  • Deploy, an interesting feature to update apps from the framework directly, skipping app store and Playstore approval processes.
  • User management for your mobile app.

Ionic View - Mobile App

As you develop with Ionic Framework, you could use emulators to test your app. How about continuously testing your app on device? Well, it's a time taking process to deploy to devices. In case of Android, I experienced wait time is much longer.

Ionic.IO Services solve this problem. During development phase, the Ionic View mobile app and cloud service allow you to update app on your device just on tap of a button.

Download Ionic View mobile app and login with your id. Similarly on your machine signup/login to ionic.io.


On your machine, open command prompt (or terminal) and navigate to the folder with your ionic app.

(If you are creating the app only now use ionic start MyAppName blank. Once the project is created CD into the new folder created.)

Use following command,
ionic io init
It might prompt you to login with your ionic io credentials (if you are not logged in already)

Upload your project by using 
ionic upload

On your mobile phone download and open Ionic View mobile app. You will see list of all your apps. Sync the app you want to play with and open it. You can test your app's functionality, screens etc. 

ngCordova

Cordova and plug-ins allow hybrid mobile app developers (PhoneGap) to access many native mobile phone features. ngCordova is a layer on top for AngularJS framework to take advantage of these plug-ins' APIs.

ngCordova exposes most of the plugin's functionality as AngularJS Services. Hence app developers can use it out-of-box.

Here is the list of services available.

ngCordova library is available as a bower component. Install by bower install ngCordova. As it's downloaded reference the ng-cordova.js in your project.

Cordova plug-ins are available soon after Cordova/Phone Gap initialization is complete. Use $ionicPlatform's .ready function callback to check if device is ready.

$ionicPlatform.ready(function() { 
 console.log("Device ready! "); 
});


Note: Individual cordova plug-ins need to be installed by cordova plugin add plug-in-refrence

Ionic Lab

It provides graphical user interface for developing your app.

Functions include


Serve: for browser emulation of the app. It starts a simple web server that hosts your app's HTML and JavaScript. Open the app in a browser window with an emulator. Chrome has in built emulators in dev-tools. It live reloads as you make changes to the code.

Emulate: for device emulation of the app. These are the real emulators that mimic real phones' hardware

Run: Deploy the app to a device through USB cable and run the app.

Build: Ionic App could be built to deploy to Android or iOS. It builds the app for given platform.

Upload: Upload the app to Ionic.Io services, which can be viewed through Ionic View app on your phone.

Share: Once uploaded app could be tested by multiple members using their own Ionic.Io account. This function allows sharing your app to other members. They could sync it on Ionic View app on their phones.

Plugins: It lists all ngCordova plug-ins (Cordova plugins encapsulated as Angular Services). You can add/remove references to your project.

Ionic Deploy

The app on Ionic IO could not only be deployed to devices for testing, but could be deployed to Production. It could be a powerful feature that eliminates need to go through Playstore or App Store for updates.

I'm curious and will watch this space to see if certain types of updates need us to still go through Playstore or App Store or is it going to be anything and everything in the scope of PhoneGap or Ionic doesn't require us to do so.

Apps could check for updates using the following JavaScript API (new Ionic.Deploy()).check()

var promise = new Ionic.Deploy().update() // returns a promise

promise.then(function(){
   // success
}, function(error){
   // error
});

In conclusion, Ionic Framework is exciting, it's bringing sophistication to Phone Gap. I keep hearing people say Hybrid is not as effective as Native. Ionic framework has already has made a dent to that perception. With what's coming next in this framework, I believe Hybrid using Ionic is the way to go.

Sunday, September 20, 2015

Azure Mobile Service as your App's backend

In continuation to the two previous blogs (Parse and Firebase), in this one describing Azure Mobile Services. It's an another option for cloud based back end that's quick to get started. Microsoft Azure is a sophisticated cloud service provider with great pricing options.

In this blog, focus is on server side code. I'm picking JavaScript back end (NodeJS) for Azure Mobile Service, which will be configured to use MongoDB for data storage.

If you are looking for JavaScript code consuming the Mobile Service use my earlier blog. It's using SQL Azure and a table for storage.

Let's get started. Log into Microsoft Azure Management portal.

Using MongoLab for our Mobile Service

Let's use Mongo Lab for the database integrating with Mobile Service. It provides MongoDb as a service on the cloud. Checkout more here.
This is also available on Azure Market Place, which we will use in this sample.
  1. Click New, Select Market Place. 
  2. Find and select MongoLab
  3. Click next and select your plan. I'm choosing Sandbox, which is free for the purposes of this blog.
  4. Click next, review and complete the purchase.

Once done select Mongo service in the Portal. Click Connection Info. Copy the connection string.


Working with Azure Mobile Service

Select the Mobile Service we wanted to work with. Make sure it's JavaScript back end. Dot net back end services have slightly different options.

Setup Source Control and clone to your machine.

Setup Source Control by clicking Setup Source Control in dashboard tab. This is required to be able to add MongoDb NPM Package to the Mobile Service back end.

Next navigate to Configure tab, copy git Url.

(Note: You always have a git URL at this place. I had to find it hard way, unless Setup Source Control is done, git URL doesn't work. I was hoping it will work with Microsoft/Azure credentials, but it has it's own user id and password)
  1. In any folder on your machine, use git clone << git URL >>
  2. Use npm install mongodb
  3. Commit and push your changes.
    • git add --all
    • git commit -m "Added MongoDB Package"
    • git push
Now the Mobile Service is ready for MongoDB Code.

Modify the mobile service to integrate MongoDB (instead of tables)

In the Mobile Service, select Data tab and resource you want to work with. In this example resource is named Book.


Next select Script tab. Here we can select Insert, Update, Read and Delete from the drop down. The script for each operation has one line by default request.execute(), which performs respective action to the SQL table. We can add additional server side validations if we wish to.

For using Mongo DB we are going to modify the script to update Mongo DB instead of SQL Table. Below are basic scripts to do so. You might improvise on these to make it more sophisticated.

Note: if you leave request.execute() it will also perform operation to the table. One interesting idea would be to go to Mongo for specific kind of data and use table for the rest.

C . R . U . D

In the data tab and selected resource (table) use drop down to switch between C.R.U.D (Create/Insert, Retrieve/Read, Update and Delete) and write code to read/insert/update/delete from MongoDB.

client.connect takes connection string, which was copied from MongoLab Market Place service earlier in the blog.


Note- Mobile service uses Patch instead of put for update


In conclusion Azure Mobile Services are flexible to use with multiple data storage options other than the default tables and yet it's quick to get started with many out-of-box features. There are many other Mobile Services' features like Push notifications, Scheduled Jobs etc. I hope to hack more of it soon.

Happy Coding.

Thursday, September 10, 2015

Parse as your app's backend

Parse is a cloud based backend service. For an application either a mobile app or a web app, Parse provides storage, SDK for easy integration and cloud services for additional processing including push notification support, analytics etc.

Parse provides APIs for variety of technologies. This blog is focusing on JavaScript. The framework is inspired by backbone and it's style of coding in JavaScript. Lot of articles use Handlebars and other templates in their examples. For simplicity, I'm using JQuery in this blog.

Get Started

  1. Once you register and login at Parse.com, create an app and launch quick start guide for it.
  2. Choose Data - Web - and New Project
  3. Here you can chose to download a blank HTML/JavaScript project or explore APIs to be added in an existing project.

Core

Parse Core provides data storage, retrieval and Data Browser. The Data Browser allows you to create one or more classes (which can be visualized as a table - refer to the screenshot). Here you can add/delete and modify data. It's the same data your app is integrating with, so changes are reflected in your app automatically (as you refresh screens).

Click on Add Class - provide name. It creates a table with default columns like objectId, CreatedAt, updatedAt etc. Click +cols to start adding custom columns.


Now, get started with code-

// Get started with initialize function
Parse.initialize("[application_id]", "[JavaScript Key]");

You get these keys as soon as you create the app. You could go to Key's screen to view and copy all available keys. If you chose to download the blank template you may use boilerplate code.

Create an object of class created in Data Browser. I'm referring to a class named book in my example.

var Book = Parse.Object.extend("book");

// Now create an object of book.
var book = new Book();

C.R.U.D

Following code demonstrates Create, Retrieval, Update and Delete of books data
// Create new records
// use set
book.set("aKey", "aValue");


Key here is same as column name in Data Browser

// Or set all column values at one-go.
book.set({aKey: 'aValue', secondKey: 'secondValue'});

//save creates the record for the table/class

// you may pass above object instead of null/first param. Then set is not required
book.save(null, {success: function(response){
   // On successful save response has all saved records.
}, error: function(error){
  // error information if occurred is in error object.
}
});


// ----------------------------------------------------------------- // Retrieval
// To Parse.Query function pass the class 
// Book below is not new'ed. It's returned value of Parse.Object.extend(). Refer to code above.
var query = new Parse.Query(Book);

// You may filter with queries like below. This looks for key with a value specified
query.equalTo("key", "value");

//or directly calling find() returns all records
query.find({
success: function(results){
for (i in results){
var data = results[i];

    // addBookRow() updates DOM with new row.
addBookRow(data.get("title"),
data.get("author"),
data.get("publisher"));
}
},
error: function(error){
$(".error").hide();
console.error(error);
}

// ----------------------------------------------------------------- // Update by getting an instance of book class for an existing record.
// I used find() for it.
query.find({
   success: function(result){
        // Get first row from results
var row = result[0];

        // update the first "title" column with new value
        row.set("title", "new value");
        row.save(null, { success: function(){}, error: function(){}});

   }
});

// -----------------------------------------------------------------
// Delete by getting an instance of book class for an existing record
// Used query.find to get it
query.find({
   success: function(result){
        // Get first row from results
var row = result[0];

        // Delete with destroy function.
        row.destory({ success: function(){}, error: function(){}});

   }
});

Refer to complete sample here

This is a introductory blog on Parse, planning to followup with concepts of
  • More queries and explore more of JavaScript parse library
  • Cloud code - additional hooks and validations on cloud. It's server side logic. Used instead of adding complex logic with-in a browser or a mobile app.
  • Parse Push - Easy integration of Push for various mobile platforms. Currently it's only for mobile devices.
Have fun Parsing!

Sunday, September 6, 2015

Firebase as your app's backend


Firebase is a cloud based back-end as a service provider. It can be used as a very effective No SQL data-store. Your application can store JSON objects. Integration is made easy with variety of libraries provided by Firebase. For this blog I'm focusing on Web/JavaScript library.

As a developer it's quick to get started. No overhead of installation and setup. It's a cloud service, so don't have worry about setting-up servers. Firebase tools on your machine are provided as an NPM package. Install with following command, globally on your machine.

npm install firebase-tools -g

This makes it a good choice for independent mobile/web app developers. Signup and login to Firebase.
Create an app. Remeber your app has a URL. JSON Key/Value pairs are shown at that URL. You might chose to manually add/remove/modify data as well.

Synchronized:

As and when data is updated in the backend, JavaScript events are raised and the callbacks provided are invoked with updated data. Hence your app is in near synchronous state all the time. With this approach we write less code, retrieving data is made simpler. Down below I've mentioned couple of data retrieval options. Checkout more here.

Consider Two Tier Architecture

With JavaScript and browsers being more and more powerful, you don't have to look at mandatory middle tier. Firebase can act as your middle tier and data store. Security, validation and authentication features of Firebase do allow this kind of architecture. 

Get Started

by referencing Firebase library in your Web Page. You could use CDN location. Or by downloading Firebase bower or npm package. I chose bower (package manager).

bower install firebase

And reference of firebase.js in bower_components. There after

//create an object of Firebase
var ref = new Firebase('URL of your firebase app');

Save Data to Firebase:

// to set a primitive data value
ref.set('sample value')
ref.set(100);

// you may set a JSON object instead
ref.set({
field1: 1,
field2: {
  child1: 'value'
}});

//If you are storing a new object every time, use push (array) instead of set.
ref.push({
field1: 1,
field2: {
  child1: 'value'
}});

Retrieve data from Firebase:

As mentioned earlier, Firebase keeps data synchronized. Data is pushed to the browser as changes happen. JavaScript code need to have callback functions defined to update view as data is retrieved automatically.

//Look for changes to the data
ref.on('value', function(snapshot){
    console.log(snapshot.val());
});

// data added as a child node.
ref.on('child_added', function(snapshot){
    console.log(snapshot.val());
})


All data elements in Firebase are represented by URL. You can traverse through the nodes in the URL itself. For example, to reach child1 in above example, you could provide URL "http://yourapp.firebase.io/field2/child1" to the Firebase function.

or you could use ref.child('field1/child1')


Running your application:

You may use any Web-Server to serve HTML files on your machine. Serve is a good choice.

npm install serve -g

Run serve from at the root folder of your application.
Firebase also provides hosting service. Run

firebase init
(Link application to Firebase app in this step.)

firebase deploy
(Deploys to Firebase cloud service)

You can serve HTML files on the cloud now. URL is on App Card It will be your appname.firebasepp.com

This is an introductory blog. Do checkout Security, Authentication, OAuth and Offline features of Firebase.


Also, I've basic Firebase examples on my Github. Use this link to explore.

Saturday, July 25, 2015

OAuth with Meetup and PhoneGap

Why?

Many sites like Facebook, Google, Meetup etc have APIs to allow third party applications perform actions on behalf of users.This integration provides powerful features and better user experience. Imagine ability to share a thought originally posted in your application to be shared on Facebook and Twitter automatically. Or comment on a meetup event from your mobile app.

OAuth allows third party apps securely access website or application on behalf of the user. User doesn't share user id password to third party application. Rather will authenticate with the original application. User will be prompted for set of features to authorize. If user authorizes successfully, the third party application could perform actions on behalf of the user.

 What?

In this blog, let's take a mobile app developed using Phone Gap authenticating with Meetup site. If user authenticates and authorizes the app, will access secure Meetup API on behalf of the user. Let's use C# for server side code. It could be a Web Site deployed on Cloud like Azure or a server within your premises.

In this blog we follow Server workflow where app authenticates with the website once. Unless user goes to Meetup site and resets access, app can continue to use the access provided. App is expected to securely store tokens on the server.

Note: 

Meetup OAuth allows user with an implicit flow where a third party app can authenticate user with Meetup site and use the resultant code to perform actions on behalf of the user. This is simple to use and App is not expected to store anything. The code will expire after a limited period of time. After that application need to authenticate again. Assuming the application is a web app in a browser, user is already logged into Meetup site on the machine, he/she won't see log-in prompt again. If not the user will get the login repeated.

This blog doesn't use this workflow, rather uses a more elaborate server workflow that doesn't involve user again as much as possible.


Following depicts server flow
Let's go through above steps 

Get access to use Meetup API (one-time)

To present Meetup login screen launch following Meetup URL. As mentioned above with OAuth user directly authenticates with the original site. No credentials are provided to the third party app.

'https://secure.meetup.com/oauth2/authorize?client_id=YOUR Key&response_type=code&redirect_uri=http://localhost/my_app'

App needs to register with Meetup at this link. Client Id in above URL is a key. This is how meetup identifies the third party apps.

In the same page you need to specify a redirect Url, once authenticated successfully Meetup redirects to this Url. In the example it's  http://localhost/my_app.  When redirected Meetup responds back with User Token in query string. 

In Phone Gap this could be achieved using InAppBrowser plugin. Install In App Browser with the following command

cordova plugin add org.apache.cordova.inappbrowser

In the Phone Gap app launch a new window (that uses InAppBrowser) to present Meetup login screen to the user.

var windowReferece = window.open('https://secure.meetup.com/oauth2/authorize?client_id=YOUR_Key&response_type=code&redirect_uri=http://localhost/my_app', '_blank', 'location=yes')

// As callback Url starts to load, handle the returned Url to get user token
windowReferece.addEventListener("loadstart",function(event){
if(event && event.url){
var replyUrl = event.url;

// extract token out of the Url
var token = replyUrl.substring(replyUrl.indexOf("code=")+5);
if(token.indexOf("&") >= 0){
token = token.substring(0,token.indexOf("&"));
}
                console.log(token);
}
});

Send given token to your API server, that handles rest of authentication and makes secure Meetup API calls. In this sample, I'm using C# server side code to further authenticate and get access tokens for secure meetup API calls.

Consider following code to get Access Token using User Token generated in the Phone Gap app,

            #region Create Request to get access token

// Client Id and secret are generated while registering with Meetup earlier at this link

                var requestContent =
    "client_id=Your client id&" + // 
    "client_secret=your client secret&" +
    "grant_type=authorization_code&" +
    "redirect_uri=http://localhost/my_app&" +
    "code=" + [[ user key obtained from Phone Gap app ]];
            WebRequest request = null;
            try
            {
                // Meetup OAuth API that gets access token
                request = WebRequest.Create("https://secure.meetup.com/oauth2/access");
                
                var requestBytes = Encoding.UTF8.GetBytes(requestContent);
                request.ContentType = "application/x-www-form-urlencoded";
                request.Method = "POST";
                request.ContentLength = requestBytes.Length;
                var requestStream = request.GetRequestStream();
                requestStream.Write(requestBytes, 0, requestBytes.Length);
                requestStream.Close();
            }
            catch (Exception exception)
            {
                Logger.LogError(exception);
                return string.Empty;
            }

            #endregion Create Request to get access token

            #region Make calls and handle response

            try
            {
                var response = request.GetResponse();
                var statusCode = ((HttpWebResponse)response).StatusCode; 

                 // Add checks based on status code.

                var responseStream = new StreamReader(response.GetResponseStream());

               // Response includes Access Token and Refresh Token. Store them (may be in DB) for Meetup API calls to use

                return responseStream.ReadToEnd();

            }
            catch (Exception exception)
            {
                Logger.LogError("Error while reading response obtained from OAUTH call. ", exception);
                return string.Empty;
            }

            #endregion Make calls and handle response

Make Secure Meetup API calls 

Above call returns Access Token, which could be used with any Meetup API that needs authentication. Consider following code

request = WebRequest.Create("https://api.meetup.com/2/member/self/");

// OAuth Access Token is passed along in request headers
                request.Headers.Add("Authorization", "Bearer " + ACCESS_TOKEN_OBTAINED_ABOVE);
                request.Method = "GET";
                
                var response = request.GetResponse();
                var statusCode = ((HttpWebResponse)response).StatusCode; 

                var responseStream = new StreamReader(response.GetResponseStream());
                var data = responseStream.ReadToEnd();

Remember, this access token is valid for 60 minutes only. After that request for access token again. Does that mean user need to be involved again? No. Use refresh token obtained in the first server side call to request for access token now on.

Following will be the request content to Meetup OAuth URL with refresh token

                var requestContent = "client_id=your client id&" +
                                     "client_secret=your client secret&" +
                                     "grant_type=refresh_token&" +
                                     "refresh_token=" + refreshToken;

That's it. Let's build some cool apps that integrate with Meetup.

For further reading and reference:
Meetup OAuth documentation
Phone Gap - Getting Started
What's Phone Gap - A basic explanation
Another way to do it - PhoneGap Plugin for OAuth
AngularJS Way - ng-cordova-oauth