Showing posts with label javascript. Show all posts

Friday, December 16, 2016

Using Flow types with React components

Continuing series on Flow, in this blog I'm writing about Flow with React. It details advantages of using Flow while building React components.
Blogger: V. Keerti Kotaru . Author of Angular Material book 

Flow is a natural choice for adding types to a React component. It's primarily because Flow and React are both Facebook's open source projects and community is expected to have better traction in that space. Having said that Typescript is a real contender. It is certainly a viable solution to add types to React components and JavaScript. Will plan to write about Typescript with React in future. To read basic details on Flow, a static type checker for JavaScript check out my earlier blogs,  
1. Idiomatic JavaScript with Flow  
2.Working with Flow on Visual Studio Code 

Type checking is not new to React components. PropTypes are often used for Props' validation. Following are couple of advantages with Flow instead of PropsTypes validation
  • Flow adds type validation for entire JavaScript code. Not just Props on a component. PropTypes validation is specific to Props.
  • Workflow - PropType validation errors are normally seen on console. On the other hand Flow extensions for IDEs show validation errors in-line with the code. It's easy to notice type validation errors.
  • Certain validations are detailed with Flow. For example, a validation that a prop is a function could be done with React.PropTypes.func. But Flow can validate return type and parameter types.

Pre-requisites

Install Flow NPM package. Assuming an NPM package is setup for your code repo, install Flow as a dev dependency on the project.

npm install --save-dev flow-bin

(Or install it globally on the machine)

npm install -g flow-bin

Getting Started with Flow for a React application

If you are using babel transpiler for React, you are all set. A Babel plugin babel-plugin-transform-flow-strip-types would remove types while transpiling. It will be installed along with the package babel-preset-react. React projects using Babel would it include it already.

In the Babel configuration file .babelrc  "presets" configuration and value "react" would run the plugin babel-plugin-transform-flow-strip-types

Code Sample

For simplicity I chose counter component. Checkout code sample at this path.  The counter increments or decrements a value every time you click on a button.

For comparison use this link to review a similar component with PropTypes for validating props.

The sample component expects a prop offset. It has a default value 1. Every time + or - button is clicked, would increment or decrement the value by 1. While invoking the component the offset could be provided as a prop, which will override the default value.

Consider following PropType validations

Counter.propTypes = { 
    offset: React.PropTypes.number 
}; 

// default value provided as below. 
Counter.defaultProps = {
    offset: 1
};

Using Flow types for Props

With Flow we can create a type alias for Props as below,
type CounterProps = { 
 offset: number; 


Specify type for the props variable on the constructor

// declare a class variable props of type CounterProps
props: CounterProps

constructor(props: CounterProps){ 
 super(props); 
 // ... 
}

// declare static variable for default props. 
static defaultProps: CounterProps;

// Now that type system is expecting defaultProps on the class, provide a value.
Counter.defaultProps = {
    offset: 1
};

Functions on props

Consider following code snippet. Every time increment or decrement event occurs, a function callback is provided to containing component. In the sample, containing component prints a string with counter data to console. The callback is invoked/called by Counter component

--------------------- main.js ---------------------------

    // While rendering counter print detailed string with time stamp provided by Counter component and counter value.
    ReactDOM.render(
        <Counter offset={4} eventCallback = {(num: number, eventTime: Date) => 
console.log(`At ${eventTime.toString()} Counter Value is ${num} `)} />
        , document.getElementById('reactApp'));

--------------------- Counter.jsx ---------------------------------------
// Counter props with optional eventCallback function declaration. Notice Maybe type highlighted
 type CounterProps = {
    offset: number;
    eventCallback?: (num: number, eventTime: Date) => void;

};


    // While invoking the callback, as the prop is optional, need to verify it's not null.
    increment(): void{
        this.setState({counterValue: this.state.counterValue + this.props.offset});

        // call provided callback function when increment and decrement events occur.
        // While invoking the callback, as the prop is optional, 
        // need to verify it's not null.
        if(this.props.eventCallback != null){
            this.props.eventCallback(this.state.counterValue, new Date());
        }
    }


The callback is an optional parameter. (Notice the ?). Hence Flow enforces null check before using the function.


References and useful links


Flow for React, official documentation - https://flowtype.org/docs/react.html#_


Tuesday, December 6, 2016

Working with Flow on Visual Studio Code

Blog describes what I believe is an optimal development setup with Flow. It details using Visual Studio Code IDE with Flow.
Blogger: V. Keerti Kotaru . Author of Angular Material book 

Flow is a static type checker. For an introductory blog on Flow's type checking, read my earlier blog.

Optimal way to run type checking with Flow.

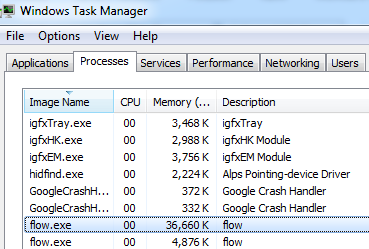
Figure 1: Flow process in the background
Primary option for type checking with Flow is to run flow in a command prompt or terminal. In VS code, you may use the integrated terminal (Ctrl + `). Flow will expect .flowconfig file at the root directory. If you are starting with Flow for the first time, run flow init to create the configuration file.

Flow will start a process (if not running already) and type checks only the JS files annotated with // @flow. Then-on, next time flow command is run, type checking will be incremental and hence it will be better performing. 

However, if you need to type check all files use flow check --all. It will start a new process and type checks all files (irrespective // @flow comment is written or not). As it starts a new process, even the ones not modified after previous type checking are checked again. It is not advisable to run every time with the --all option.

Visual Studio Code.

Ever since Visual Studio Code has been launched I've been using it extensively for JavaScript development. It's light weight & launches fast, got an integrated terminal or command prompt for running, npm, grunt or gulp tasks. It's available on both Windows and Mac machines. It has rich set of extensions for all utility actions. You may prefer to use extensions instead of typing in commands in terminal

For Flow's type checking, I'm currently using "Flow Language Support" published by Flowtype . Follow this link to view and download the extension.

Flow extension points out errors inline with the code. JavaScript files annotated with // @flow comment on top of the page are type checked. Use Problems Window or move the mouse over error to see details on each error. See figure2. Status bar shows error/warning count, click on which brings up the problems window.

Figure 2: VS Code's extension for Flow shows errors with type checking
Note: The above extension starts Flow background process once the window is launched. It incrementally type checks new files.

Skip JavaScript and Typescript syntax checking in VS Code.

In VS Code Flow and the default Typescript or JavaScript syntax checks could conflict. Use the following configuration to disable default checks.

Errors due to conflict with Typescript
"javascript.validate.enable": false,
"typescript.validate.enable": false

Go to Preferences >> Workspace Preferences (or User Preferences) and provide the configuration in settings.json. 

Note: Updating the configuration in Workspace preferences would skip JS and Typescript checking in only the current project. Updating it in User Settings will skip for all projects.

The workspace settings could be checked-in to git or any other source control. The settings are saved in settings.json under .vscode folder at the root directory. This will allow all developers on the project obtain settings by default. We don't have to do it on each machine explicitly.

References and useful links.

VS Code extension for Flow - https://marketplace.visualstudio.com/items?itemName=flowtype.flow-for-vscode
Documentation on starting a new Flow project - https://flowtype.org/docs/new-project.html#_

Thursday, December 1, 2016

Idiomatic JavaScript with Flow

This blog describes Flow, a static type checker for JavaScript. It provides getting started details and basic concepts of type checking using Flow.
Blogger: V. Keerti Kotaru . Author of Angular Material book 

What is Flow?

Flow is a static type checker for JavaScript. It is an open source project by Facebook (GitHub link). It enables specifying types for variables and objects in JavaScript.

Flow type checking could be run on a console. Easier option is to use plug-ins or extensions with IDEs. I use Visual Studio Code for JavaScript development. I find Flow Language Support extension by Flowtype publisher pretty useful. Follow the link to view and install it.

How does it work?

Specifying types for JavaScript variables and objects could be useful as they point out common code errors that could result in bugs. However, browsers do not understand flow syntax and type annotations. Flow types need to be stripped off before running on the browser. And hence Flow is a static type checker, rather than a language.

Setup Flow

Assuming an NPM package is setup for the sample code repo, install Flow using as a dev dependency on the project.

npm install --save-dev flow-bin 

We may use Babel plug-in to strip off types. But for simplicity, in this getting started blog, I'm using flow-remove-types NPM package.

Install flow-remove-types package globally on your machine.

npm install -g flow-remove-types

The code sample described in the blog is launched to Index.html. Sample also has a JavaScript file with type syntax, named index.js. As described above, once we add Flow types to the code, browser can't understand Flow syntax. Hence we will generate JavaScript file without Flow types for browsers to run. In the sample I named it bundle.js. It is generated using the flow-remove-types script. Add reference to bundle.js in Index.html

Run the following command to strip types.
flow-remove-types index.js --out-file bundle.js

Refer to complete code at this link

JavaScript Idioms

Flow claims to work well with JavaScript style of coding and idioms. I attempted the following basic samples.

In the index.js to start type checking add the following comment  on top of the file.
// @flow

Consider following function

// @flow

((number1, number2) => number1 * number2)(10,20)

The function takes two parameters number1 and number2. In the above statement we are calling the function with values 10 and 20. Here flow is inferring a type number to the parameters as we are calling the function with numeric values. Consider following code erroneously providing string on the first parameter. 

// notice first parameter is a string.
((number1, number2) => number1 * number2)('Im String',20)


Flow points out the error on variable number1, string (The operand of an arithmetic operation must be a number.).


In the above example, we haven't started using types yet. Just by adding the // @flow comment on top of the file, type checking can begin and certain problems are alerted. However, the error is shown on the statement multiplying numbers for an incorrect parameter value. Flow implied string variable because the function was called with a string. It showed the error as it finds multiplication applied on string. 

Add types

Adding types makes the developer intent clear. We can declare a variable with syntax variableName: type syntax. Consider following sample

let isItCool:boolean; 
isItCool = true;

We declared a boolean and assigned true. Assigning a non boolean will show the type error.

isItCool = "test string";
string (This type is incompatible with boolean)

Now, let's rewrite the above multiplication function with types in paramters

((number1: number, number2: number) => number1 * number2)('Im String',20)

Now the error is specific, string (This type is incompatible with number)


Let us now consider specifying return type. Here I modified multiplication to addition, a string parameter will result in concatenating two values. Consider following code,

((number1, number2) => number1 + number2)('10',20)
// It will result in 1020

This depicts why explicit typing is important to avoid bugs. Consider specifying return type on the function. Following is the modified function. Notice the highlighted part for return type.

((number1, number2):number => number1 + number2)('10',20)

Specifying return type results in error depicting resultant string is incompatible with numeric type.

string (This type is incompatible with the expected return type of number

However specifying input parameters' type will point out error with string input parameter for number type in the first place.

References and more reading material

Complete Sample - https://github.com/kvkirthy/VenCKI-Samples/tree/master/Flow-basic-sample
Read getting started guide here, https://flowtype.org/docs/getting-started.html
Visual Studio Code plug-in for Flow https://marketplace.visualstudio.com/items?itemName=flowtype.flow-for-vscode

Sunday, June 26, 2016

Implementing HTTP Client in Angular 2 using Observables (RxJS) and Promises


Angular 2 provides a choice between Observables and Promises for developing a HTTP client that invokes server side API. This blog discusses the two options.


RxJS Introduction - Reactive Extensions (Rx) is a Microsoft backed open source project. It is an event driven, asynchronous design approach. It helps develop effectively for a stream of data returned through asynchronous and time consuming operations. The async operation could be network operations, UI interactions, file IO etc. There are Rx libraries available for galore of programming languages like C#, Python, JavaScript, Java so on. Follow this link for a complete list. As you might have guessed, RxJS is JavaScript library for Reactive Extensions.

Angular 2, RxJS and Promises- At first, let us look at Angular 2's usage of RxJS for making HTTP calls. Later in the blog, we will review promises.

HTTP calls are asynchronous in JavaScript. Earlier implementations of Angular (1.x) used promises. It has success and error callbacks that are invoked when the call is done.

Angular 2 provides a choice between RxJS and Promises. Observables support stream of data, where as promises are done once the current invocation is complete. And also, observables could be cancelled (or unsubscribed).

While RxJS 4 focussed on ES 5 implementation, RxJS 5 is a rewrite for ES 2015 (ES 6). For more details on RxJS 5, follow this link to GitHub Repo. It is in beta at the time of writing this blog.

Note: My previous blog discusses RxJS 4 in an Angular 1.x application. Follow the link to check-out the blog.

A Sample implementation - Just so that focus is on demonstrating HTTP client, will take a very simplistic code sample. It shows list of players (sports stars) on a page. The list is obtained from a node service (server side) over a HTTP GET call, on click of a button. Consider following image.


We will be implementing this using Angular 2 and TypeScript.

The code to retrieve players is encapsulated in playerService.ts Consider following code. Read through the comments for details on each line of code.

// Injectable decorator for allowing a class to be exported as service/provider.
import {Injectable} from '@angular/core';

// Http and Response for making HTTP calls
import {Http, Response} from '@angular/http';


// RxJS Observable

import {Observable} from 'rxjs/Observable'

// Get everything rxjs
import 'rxjs/Rx';

// Injectable decorator for allowing a class to be exported as service/provider.
@Injectable()
export class PlayerService {
   

    // inject Http instance for making HTTP calls.
    constructor(private http: Http){}


    getData(): Observable<Response> {
        return this.http.get('api/search');
    }
}


Consider the getData() function, it returns an observable of HTTP response. 

What is an obserable? It is an array or stream of data made available asynchronously. As the term indicates it is an object that could be observed for data to be made available. The observable emits data only when there is an observer. In other words, the observable could be subscribed to by an observer.

Consider following code. It is a function in an Angular 2 component. This component is bound to a UI template. The component subscribes to the observer on click of the button with caption "Get player list".

  getData(){
    this.serviceInstance
      .map(result => result.json())
      .subscribe( result => this.players = result);
  }


Following the link for the complete component class.

map is an RxJS operator for transforming the response to player list. The players array on the component is bound to the associated view/template. Refer to the following template code. ngFor iterates through players array. Bindings on JSON properties can be seen with-in the curly braces - {{}}.

    <div *ngFor="let item of players">
        <div>
            <strong>{{item.name}}</strong>
            <div><span>{{item.age}}</span> . <span>{{item.gender}}</span></div>
            <div>{{item.email}}</div>
            <div><hr></div>
        </div>
    </div>


Promises - Above functionality could be achieved using familiar promises as well. Observables are advisable for their sophistication. But if you prefer to stick to promises, API is available.

Promise too is asynchronous. After making a HTTP call. success or error callback are invoked with the response. Consider following code snippet in the service class (playerService.ts). It returns promise of HTTP response.

    getDataAsAPromise(): Promise<Response> {
        return this.http.get('api/search').toPromise(); // toPromise() is responsible for obtaining a promise from the get call.
    }


Consider following code. In the calling function, as the promise is resolved, one of the "then function callbacks" are invoked. First parameter is a success callback. Second parameter is an error callback. The success callback sets result on component's players array, which has bindings in the template. (refer to the template/HTML code in above section)

  getDataAsAPromise(){
    this.service.getDataAsAPromise().then( result => this.players = result.json(), error => console.log(error));
  }


Follow this link for complete code sample. "Read me" file has details to run the sample.


References

https://github.com/ReactiveX/rxjs
https://angular.io/docs/ts/latest/guide/server-communication.html#!#http-client
http://reactivex.io/languages.html
https://msdn.microsoft.com/en-in/data/gg577609.aspx

Wednesday, March 16, 2016

Typeahead search with RxJS in AngularJS applications

This blog aims to demonstrate concept of Observables in AngularJS. I'm using Typeahead search as an example. It describes implementing Typeahead search in Angular 1.x

Introduction

RxJS - Reactive Extensions JavaScript is dealing with streams of data asynchronously. Observables is one of the important aspects of RxJS. Observable results in stream of data.  Many times, for understanding Observables they are compared to Promises. Both deal with asynchronous actions. Difference is unlike Observable, Promise is done once the asynchronous operation is complete. Consider a Http call. Promise is complete once response is obtained (or the call errors out). With Obserables data or items are emitted continuously like a stream.

Where do we see stream of data in JavaScript, especially in a browser? I could think of couple of examples,
  1. Data bound to UI controls: As user interacts with the UI, edits a text field, selects an option in the drop down, and continues to do so, there are series of changes emitted from the control.
  2. Web Socket - a persistent connection. Server could send a stream of data. As long as the connection is open, browser (or other clients) could continue to obtain new pieces of data. Unlike a XHR, it's not done once we receive response soon after establishing connection.
Another difference between Promises and Observables is that, Observables can be unsubscribed (cancelled). 

In the blog, I'm planning to write about "Typeahead search". Here the UI control is an Observable. It emits data items. As user starts keying in search term into the text box results are updated. It triggers XHR request with each change or set of key strokes in the text field. Show results using the latest response. Cancel in-progress, old and obsolete XHRs.

Sample is using AngularJS (v1.x) and RxJS libraries to code this functionality.

Run with Angular 1.x

bower install angular angular-rx

Reference the libraries
  <script src="bower_components/rxjs/dist/rx.lite.min.js"></script>        
  <script src="bower_components/angular/angular.min.js"></script>
  <script src="bower_components/angular-rx/dist/rx.angular.js"></script>

Bootstrap Angular module with "rx" module as a dependency.
angular.module("typeAheadSample", ["rx"]);

Consider the following template for text field. This is where user keys in the search term.
<input type="text" ng-model="searchString" ng-change="search()">

Notice we are calling "search()" controller function (on $scope) for changes detected with the text field. In the controller inject "rx" service for creating an Observable and $http for making API calls.

Create an observable function using rx service API,
var searchControlObservable= $scope
          .$createObservableFunction('search');

RxJS has galore of operators (which are functions in JS). Before I describe one such operator, remember an Observable emits items or data. In our example as and when user keys in values into text field, observable is emitting the text to all observers (subscribers). 

Each search term results in search result (from the API). And we have series of results. That means we have Observables of Observables.

Consider following code,
 searchControlObservable searchControlObservable
         .debounce(500)// Observable holds off 500 milliseconds before emitting data.
         .flatMapLatest(function(term){
             return rx.Observable                                
                   .fromPromise($http({
                      url: "http://localhost:3001/api/search?term=" + $scope.searchString,
                      method: "get"                                
                    }))
                   .map(function(response){                                
                       return response.data;    
                    });
               });

The callback for flatMapLatest is invoked for every emitted item of searchControlObservable (which is result of text field change events). This in turn returns Observables out of XHR calls. These are Observables from promises.

flatMap is an operator, useful in such scenarios where we have Observables of Observables. It transforms and merges. A variant of flatMap is flatMapLatest. In our scenario only the latest search result matters. Previous ones could be ignored. So it stops or unsubscribes from previous Observables. As stated earlier unlike Promises, Observables could be stopped or unsubscribed from.

Also notice debounce(500); It will hold off emitting items for 500 ms. This will help control number of XHR calls. We can increase / decrease the number depending on the requirement, acceptable limit for load on the API etc. Ideally we want search calls made for considerable text keyed-in, instead of every little change.

With debounce

Without debounce


And finally, map returns transformed object. 

Subscribe to receive items emitted by Observable,
  .subscribe(function(results) {
                            $scope.$apply(function(){
                                $scope.messages = results;  
                            });
                        });      

Note: Subscribe function accepts three callbacks or another Observer instance. i) Above example has onNext handler (which receives items emitted by Observer). ii) Error handler iii) onCompleted handler. If an Observer object is passed, its callbacks are invoked.

Loop through the response to show the list of ,
<div ng-repeat="message in messages track by $index">
    <div>{{message.name}}</div>
</div>

Note: The API in the sample (http://localhost:3001/api/search?term=) is a dummy node API that reads from a file and returns results. It's a quick search service for demonstration purposes.          

Follow the link for complete code sample. Follow instructions in ReadMe to download and run the sample.

References


Monday, December 28, 2015

Service Worker - Give native app experience to web app on mobile

Context:

In today's mobile app development, there are lot of things web apps on mobile can't do compared to native apps. But the gap is filling fast. Offline access is one such example. Facebook native app for example, when disconnected shows recent 15+ posts. You may continue to use the app. When connected to Internet it will sync data. Imagine similar functionality to a Web App. It's especially useful on  mobile devices - phones and tablets.

Service Worker helps cache application (JavaScript, HTML, CSS) and data. It's a specification created by Google Chrome and Mozilla.

Following is a sample I tried out with SW-PreCache and SW-Toolbox repos. I'm documenting steps to create the service worker in the sample app below, The sample app shows dinosaur data from a Web URL (thanks to Firebase - it's one of the sample data sets provided by Firebase).

Sample App

Here is the complete code repo for sample app.

The sample app is coded using AngularJS, Bootstrap CSS framework for responsive design on mobile screen. Controller accesses dinosaur data from Web URL and assigns to scope. If there is a problem accessing data it will set flag so that UI can show error message.

$http.get("https://dinosaur-facts.firebaseio.com/dinosaurs.json")
.success(function(results){
$scope.dinosaurs = results;
})

.error(function(error){
  // Set flag - show error message when there is a problem retrieving data.
$scope.showAlert = true;
$scope.errorMessage = "Ooops, Jurassic park is unavailable! Are you connected to Internet?";

});

View is HTML in index.html - ng-repeat to show data.

<div class="container" ng-controller="firstController">
<table class="table table-striped">
<tr ng-repeat="(dinosaur,prop) in dinosaurs">
<td><strong>{{dinosaur}}</strong></td>
<td>Appeared {{prop.appeared}} years ago</td>
<td>{{prop.height}} meters long</td>
<td>{{prop.length}} meters wide</td>
<td>{{prop.weight}} pounds</td>
</tr>
</table>
</div>


Or show error message when no there is no connectivity,
<div ">
<div ng-show="showAlert" class="alert alert-danger alert-dismissible " role="alert">
<button type="button" class="close" data-dismiss="alert" aria-label="Close"><span aria-hidden="true">&times;</span></button>
{{errorMessage}}
</div>

Browser error vs graceful error: 

On a browser go to a link when offline, you would see browser error page. How about native like graceful error message? Create a shortcut to home screen like a native app and as you tap it graceful error message is shown (if there is no network connectivity). You could provide more details of the error as well. It's better user experience compared to browser error page. Following is an example


For this, we could use Service Worker to cache application skeleton. SW-PreCache makes this process simple.
  1. Install using bower install sw-precache
  2. Modify grunt file in demo app, Update staticFileGlobs property to new files in the sample. Modify handleFetch property to true so that it starts serving cached content. Here is the link to new file.
  3. Run grunt swPrecache. It now generates service-worker.js. It need to be registered with Service Worker on the browser. A service-worker-registration.js file is reusable. It takes care of checking service worker feature availability on the browser, checking if there is a newer version of service-worker.js so that it can be re-installed etc.
  4. Include this file in Index.html so that registration happens.
You are done. As you run the app, all specified files in grunt task are cached. Even if network is disconnected, cache is used. 

Note: I'm using grunt to generate pre-cache for the sample. Gulp is supported and there are multiple examples using gulp as well.

Cache Data:

sw-toolbox helps cache data easily. 
  1. Install sw-toolbox using bower. bower install sw-toolbox
  2. Import toolbox script using importScripts('node_modules/sw-toolbox/sw-toolbox.js');
  3. Provide following configuration for caching data from given XHR calls. It caches all calls to dinosaur-facts.firebaseio.com. 
toolbox.router.get('/(.*)', toolbox.networkFirst, { 
 // Use a dedicated cache for the responses, separate from the default cache. 
 cache: { 
   name: 'sample-app', // Store up to 10 entries in that cache. 
   maxEntries: 10, // Expire any entries that are older than 30 seconds. 
   maxAgeSeconds: 30 
 }, 
 origin: 'dinosaur-facts.firebaseio.com' 
});
This Service Worker once registered with the browser will use cached data when disconnected.

It caches any URL pattern. Handler toolbox.networkFirst is used so that first preference is given to network. Only if network connection is unavailable, cached data is used. We could use cacheFirst where data is immediately loaded from cache and then updated once obtained over network. More options are fastest - make both calls network and cache, whichever comes first will be used. networkOnly - when you never want to use cached data for a route. cacheOnly - when you are sure network call won't be made for that route.

Here is a quick demo of Service Worker Sample App


Link to the demo page.

In conclusion I believe Service Worker is going to be revolutionary for mobile web app development. Recent Chrome Dev Summit had shout-out for Flipkart for implementing this feature on Chrome. I explored chrome://serviceworker-internals to see Facebook and Medium are using it as well.

Happy coding Service Worker in the new year 2016 !

Code repo for sample app.

Wednesday, November 11, 2015

Firebase and those useful little things

In this blog, I'm attempting to write about useful features and tools that Firebase provides. These could make your job easy and some might even have a use case for you.

Open Data sets

Firebase provides open data sets that have read access to everyone. Live information is served for Airport delays across major cities in the US, crypto currencies like bit coins data, earthquake data, real time transit vehicle location data for many cities in the US, weather data and even parking fares and availability of parking slots in SFO city. 
One could see these as a demonstration of quality of Firebase service and validate real world scenarios. They also provide utility value for a Website or a mobile app. It's documented at this link 

Consider following code that reports airport delays at SFO using Firebase open data set and AngularJS


Vulcan - Chrome extension

Vulcan is a Google Chrome extension to view and edit Firebase data. (Link to the extension). Even though most of viewing and editing could be done by opening the Firebase application in a browser, Vulcan makes it easy to add and edit JSON node to your dataset.

Firebase Tools - Bootstrap

Bootstrap option in Firebase tools allow you to create a template or sample app on your machine. It provides all nuts and bolts for the app already. You could keep required features, enhance them and yank any unnecessary code. Follow below steps create a skeleton project

1. Install Firebase Tools
npm install -g firebase-tools

2. Run bootstrap
firebase bootstrap

3. It will ask couple of questions like, which Firebase app would you point to and chose from list of available template projects. Refer to the list below. After making the selection template project is created in a folder at the current directory.

Note: will ask you to authenticate using Firebase credentials if you are not already logged in.
----------------------------------------------------
Available Templates
----------------------------------------------------
angular     - The AngularFire seed template
backbone    - Example to-do app using BackFire
chat        - A realtime multi-person chat client with JavaScript, HTML, and CSS

drawing     - Share a canvas and collaboratively draw with other users
firechat    - A more fully-featured chat widget using Firechat
firepad     - Collaborative text editing with Firepad
ionic       - A small chatroom application written for Ionic
leaderboard - A leaderboard which keeps track of high scores in realtime
presence    - Show who is available, who is idle, and who is gone
react       - Example to-do app using ReactFire
tetris      - Play head-to-head Tetris in your browser

Firebase Hosting

If you have static content files that potentially retrieve and update data to Firebase can be deployed to Firebase Hosting service. (need not necessarily interface with Firebase)

To do so, CD into the directory with HTML pages and run, firebase init
It will prompt you to point to the Firebase app in your profile. Once done downloads firebase.json with details of configuration.

You could run firebase deploy anytime later. that will upload files to firebase hosting service. URL to access the static files is shown on the app card on Firebase dashboard. (refer to the screenshot here)

Note: will ask you to authenticate using Firebase credentials if you are not already logged in.

These are some of the many Firebase features and tools. Hope these provide value while developing with Firebase and make it more exciting. Happy coding.

Thursday, September 10, 2015

Parse as your app's backend

Parse is a cloud based backend service. For an application either a mobile app or a web app, Parse provides storage, SDK for easy integration and cloud services for additional processing including push notification support, analytics etc.

Parse provides APIs for variety of technologies. This blog is focusing on JavaScript. The framework is inspired by backbone and it's style of coding in JavaScript. Lot of articles use Handlebars and other templates in their examples. For simplicity, I'm using JQuery in this blog.

Get Started

  1. Once you register and login at Parse.com, create an app and launch quick start guide for it.
  2. Choose Data - Web - and New Project
  3. Here you can chose to download a blank HTML/JavaScript project or explore APIs to be added in an existing project.

Core

Parse Core provides data storage, retrieval and Data Browser. The Data Browser allows you to create one or more classes (which can be visualized as a table - refer to the screenshot). Here you can add/delete and modify data. It's the same data your app is integrating with, so changes are reflected in your app automatically (as you refresh screens).

Click on Add Class - provide name. It creates a table with default columns like objectId, CreatedAt, updatedAt etc. Click +cols to start adding custom columns.


Now, get started with code-

// Get started with initialize function
Parse.initialize("[application_id]", "[JavaScript Key]");

You get these keys as soon as you create the app. You could go to Key's screen to view and copy all available keys. If you chose to download the blank template you may use boilerplate code.

Create an object of class created in Data Browser. I'm referring to a class named book in my example.

var Book = Parse.Object.extend("book");

// Now create an object of book.
var book = new Book();

C.R.U.D

Following code demonstrates Create, Retrieval, Update and Delete of books data
// Create new records
// use set
book.set("aKey", "aValue");


Key here is same as column name in Data Browser

// Or set all column values at one-go.
book.set({aKey: 'aValue', secondKey: 'secondValue'});

//save creates the record for the table/class

// you may pass above object instead of null/first param. Then set is not required
book.save(null, {success: function(response){
   // On successful save response has all saved records.
}, error: function(error){
  // error information if occurred is in error object.
}
});


// ----------------------------------------------------------------- // Retrieval
// To Parse.Query function pass the class 
// Book below is not new'ed. It's returned value of Parse.Object.extend(). Refer to code above.
var query = new Parse.Query(Book);

// You may filter with queries like below. This looks for key with a value specified
query.equalTo("key", "value");

//or directly calling find() returns all records
query.find({
success: function(results){
for (i in results){
var data = results[i];

    // addBookRow() updates DOM with new row.
addBookRow(data.get("title"),
data.get("author"),
data.get("publisher"));
}
},
error: function(error){
$(".error").hide();
console.error(error);
}

// ----------------------------------------------------------------- // Update by getting an instance of book class for an existing record.
// I used find() for it.
query.find({
   success: function(result){
        // Get first row from results
var row = result[0];

        // update the first "title" column with new value
        row.set("title", "new value");
        row.save(null, { success: function(){}, error: function(){}});

   }
});

// -----------------------------------------------------------------
// Delete by getting an instance of book class for an existing record
// Used query.find to get it
query.find({
   success: function(result){
        // Get first row from results
var row = result[0];

        // Delete with destroy function.
        row.destory({ success: function(){}, error: function(){}});

   }
});

Refer to complete sample here

This is a introductory blog on Parse, planning to followup with concepts of
  • More queries and explore more of JavaScript parse library
  • Cloud code - additional hooks and validations on cloud. It's server side logic. Used instead of adding complex logic with-in a browser or a mobile app.
  • Parse Push - Easy integration of Push for various mobile platforms. Currently it's only for mobile devices.
Have fun Parsing!

Saturday, July 25, 2015

OAuth with Meetup and PhoneGap

Why?

Many sites like Facebook, Google, Meetup etc have APIs to allow third party applications perform actions on behalf of users.This integration provides powerful features and better user experience. Imagine ability to share a thought originally posted in your application to be shared on Facebook and Twitter automatically. Or comment on a meetup event from your mobile app.

OAuth allows third party apps securely access website or application on behalf of the user. User doesn't share user id password to third party application. Rather will authenticate with the original application. User will be prompted for set of features to authorize. If user authorizes successfully, the third party application could perform actions on behalf of the user.

 What?

In this blog, let's take a mobile app developed using Phone Gap authenticating with Meetup site. If user authenticates and authorizes the app, will access secure Meetup API on behalf of the user. Let's use C# for server side code. It could be a Web Site deployed on Cloud like Azure or a server within your premises.

In this blog we follow Server workflow where app authenticates with the website once. Unless user goes to Meetup site and resets access, app can continue to use the access provided. App is expected to securely store tokens on the server.

Note: 

Meetup OAuth allows user with an implicit flow where a third party app can authenticate user with Meetup site and use the resultant code to perform actions on behalf of the user. This is simple to use and App is not expected to store anything. The code will expire after a limited period of time. After that application need to authenticate again. Assuming the application is a web app in a browser, user is already logged into Meetup site on the machine, he/she won't see log-in prompt again. If not the user will get the login repeated.

This blog doesn't use this workflow, rather uses a more elaborate server workflow that doesn't involve user again as much as possible.


Following depicts server flow
Let's go through above steps 

Get access to use Meetup API (one-time)

To present Meetup login screen launch following Meetup URL. As mentioned above with OAuth user directly authenticates with the original site. No credentials are provided to the third party app.

'https://secure.meetup.com/oauth2/authorize?client_id=YOUR Key&response_type=code&redirect_uri=http://localhost/my_app'

App needs to register with Meetup at this link. Client Id in above URL is a key. This is how meetup identifies the third party apps.

In the same page you need to specify a redirect Url, once authenticated successfully Meetup redirects to this Url. In the example it's  http://localhost/my_app.  When redirected Meetup responds back with User Token in query string. 

In Phone Gap this could be achieved using InAppBrowser plugin. Install In App Browser with the following command

cordova plugin add org.apache.cordova.inappbrowser

In the Phone Gap app launch a new window (that uses InAppBrowser) to present Meetup login screen to the user.

var windowReferece = window.open('https://secure.meetup.com/oauth2/authorize?client_id=YOUR_Key&response_type=code&redirect_uri=http://localhost/my_app', '_blank', 'location=yes')

// As callback Url starts to load, handle the returned Url to get user token
windowReferece.addEventListener("loadstart",function(event){
if(event && event.url){
var replyUrl = event.url;

// extract token out of the Url
var token = replyUrl.substring(replyUrl.indexOf("code=")+5);
if(token.indexOf("&") >= 0){
token = token.substring(0,token.indexOf("&"));
}
                console.log(token);
}
});

Send given token to your API server, that handles rest of authentication and makes secure Meetup API calls. In this sample, I'm using C# server side code to further authenticate and get access tokens for secure meetup API calls.

Consider following code to get Access Token using User Token generated in the Phone Gap app,

            #region Create Request to get access token

// Client Id and secret are generated while registering with Meetup earlier at this link

                var requestContent =
    "client_id=Your client id&" + // 
    "client_secret=your client secret&" +
    "grant_type=authorization_code&" +
    "redirect_uri=http://localhost/my_app&" +
    "code=" + [[ user key obtained from Phone Gap app ]];
            WebRequest request = null;
            try
            {
                // Meetup OAuth API that gets access token
                request = WebRequest.Create("https://secure.meetup.com/oauth2/access");
                
                var requestBytes = Encoding.UTF8.GetBytes(requestContent);
                request.ContentType = "application/x-www-form-urlencoded";
                request.Method = "POST";
                request.ContentLength = requestBytes.Length;
                var requestStream = request.GetRequestStream();
                requestStream.Write(requestBytes, 0, requestBytes.Length);
                requestStream.Close();
            }
            catch (Exception exception)
            {
                Logger.LogError(exception);
                return string.Empty;
            }

            #endregion Create Request to get access token

            #region Make calls and handle response

            try
            {
                var response = request.GetResponse();
                var statusCode = ((HttpWebResponse)response).StatusCode; 

                 // Add checks based on status code.

                var responseStream = new StreamReader(response.GetResponseStream());

               // Response includes Access Token and Refresh Token. Store them (may be in DB) for Meetup API calls to use

                return responseStream.ReadToEnd();

            }
            catch (Exception exception)
            {
                Logger.LogError("Error while reading response obtained from OAUTH call. ", exception);
                return string.Empty;
            }

            #endregion Make calls and handle response

Make Secure Meetup API calls 

Above call returns Access Token, which could be used with any Meetup API that needs authentication. Consider following code

request = WebRequest.Create("https://api.meetup.com/2/member/self/");

// OAuth Access Token is passed along in request headers
                request.Headers.Add("Authorization", "Bearer " + ACCESS_TOKEN_OBTAINED_ABOVE);
                request.Method = "GET";
                
                var response = request.GetResponse();
                var statusCode = ((HttpWebResponse)response).StatusCode; 

                var responseStream = new StreamReader(response.GetResponseStream());
                var data = responseStream.ReadToEnd();

Remember, this access token is valid for 60 minutes only. After that request for access token again. Does that mean user need to be involved again? No. Use refresh token obtained in the first server side call to request for access token now on.

Following will be the request content to Meetup OAuth URL with refresh token

                var requestContent = "client_id=your client id&" +
                                     "client_secret=your client secret&" +
                                     "grant_type=refresh_token&" +
                                     "refresh_token=" + refreshToken;

That's it. Let's build some cool apps that integrate with Meetup.

For further reading and reference:
Meetup OAuth documentation
Phone Gap - Getting Started
What's Phone Gap - A basic explanation
Another way to do it - PhoneGap Plugin for OAuth
AngularJS Way - ng-cordova-oauth

Sunday, January 18, 2015

Push Notifications for Phone Gap App using GCM and Mobile Service

Push Notifications are part of our lives everyday. We get alerted about new emails, news updates, What's app, Facebook Twitter messages so on every hour (or every minute for some :D ). When an app is running, it could request for data and present it on the screen.Push Notifications alert user with information even when the app is NOT open. For example email alert appearing even when the email app is not running on the mobile device.

Windows Azure Mobile Services (integrated with Notification Hub) simplifies sending notifications to multiple mobile platforms, Android, iOS, Windows Phone 8 etc. In this blog, I'm writing about Android Notifications. Will be writing about other mobile platforms (using mobile services) in upcoming blogs.

Here is the agenda for this blog,
  1. GCM (Google Cloud Messaging)
  2. Azure Mobile Services for sending Push Notifications
  3. Phone Gap App registering and receiving notifications

GCM for Android:

For an app installed on your Android device, GCM can send messages over the internet even when the app is not open. It has the ability to queue messages when the device is offline and send it when connected (if message doesn't expire). These messages popup in the notification area. App can be launched when user taps on a notification.

Refer to the image depicting steps involved in sending push notification using GCM. This is one of the ways to use GCM. For the case I'm describing in the blog, with Azure Mobile service, this design fits.

In the five step process described in the image, i) each phone registering with GCM for notification will get a reg id. App will store Sender Id/Project number and send it in the request to get reg id. ii) Developer need to generate API key through Google Developer Console and use it while sending Push Notifications. This way GCM is sure sender of the message is owner of the app.

Azure Mobile Service

Azure Notification Hub allows sending Push Notification to cross platform devices and apps. Mobile Service is integrated with Notification Hub allowing easy notifications. It acts as the server in above architecture. It automates most part of action 4 i) Saving reg Ids, ii) Storing API key and verifying with GCM and iii) Provides easy API for sending notifications. It also provides ready made client libraries for making GCM calls and registration with notification hub.

Let's get the app ready!

  1. Setup in Google Developer Console.
  2. Setup Mobile Services 
  3. Add Push Notifications to Hybrid Mobile App.

Setup in Google Developer Console.

  1. Log into Google Developer Console http://console.developers.google.com
  2. Click Create New Project, provide Project Name and click Create.
  3. Make a note of Project Number, that is the Sender Id.
  4. Click on the project to get into details view.
  5. In the left navigation panel, select Credentials under API & Auth.
  6. Click Create New Key. In the popup window, select server key.
  7. Make note of generated API Key.
  8. Click on APIs under APIs and Auth and make sure Google Cloud Messaging for Android is "ON"

Setup Mobile Service:

Log into Windows Azure Management Portal.
Enable Push Notifications on Mobile Services for GCM.
  1. Select the Mobile Service providing Push Notification functionality.
  2. Click on Push tab.
  3. Under Google Cloud Messaging Settings, specify API Key noted from Google Developer Console.
Update script that triggers Push Notification
  1. Select Data tab and click on table that need to trigger Push Notification.
  2. Click on Script tab.
  3. Select appropriate action among Insert, Update, Delete or Read. And update following code. (read descriptions in the comments)
// add additional behavior to request.execute for Push Notification.
request.execute({
       success: function() {
           // template for the payload
           var pn= '{ "message" : "Sample push notification" }';
// push.send notifies all configured mobile platforms (iOS, Android, WP8) etc. Using push.gcm.send for GCM only.
// first parameter of send specifies all tags. 

           push.gcm.send(null, pn, {
               success: function(response){
                   console.log("Sent push:", response);
                   request.respond();
               },
               error: function (error) {
                   console.log("Failed to send PN", error);
                   request.respond(500, { error: pushResponse });
               }
            });
       }
   });

Enable Phone Gap mobile app to send Push Notifications:

Add push plugin-
cordova plugin add https://github.com/phonegap-build/PushPlugin.git

Device plugin
cordova plugins add https://github.com/apache/cordova-plugin-device.git

Note: include scripts for Mobile Service and Notifications Hub MobileServices.Web-1.2.5.js and NotificationHub.js. They are downloadable from Mobile Service HTML/JS template project.
// set up Push Notification as the app is launched and deviceReady event is fired

 var pushNotification = window.plugins.pushNotification;

// Mobile Client object is created at script file level.
 mobileClient = new WindowsAzure .MobileServiceClient("https://my.mobile.service.url/", "my-mobile-service-key");

  if(pushNotification){
// Phone Gap App and Mobile Service could be used for non Android platforms as well. So check this condition. Else conditions on other mobile platforms shall be added.
if ( device.platform == 'android' || device.platform == 'Android' ){
       pushNotification.register(
           app.successHandler, app.errorHandler,
               "senderID": GCM_SENDER_ID, // it's the project number
               "ecb": "gcmCallback" // function to be called by GCM Service for completing registration.
              });
            } 
         }


GCM Callback below.
    function gcmCallback (e) {
     switch (e.event) {
//This function is called in two scenarios, while registering device with GCM and while receiving Push Notifications
     case 'registered':
          if (e.regid.length > 0) { // regId will be sent back to Notification Hub/ Mobile Service.
              if (mobileClient) {
// Client library for notification hub -that allows multi-platform Push Notifications. Of course, Here we are focusing on GCM/Android.
             var notificationHub= new NotificationHub(mobileClient);

 // Set template for data to be sent by Mobile Service
            var template = "{ \"rootObject\" :{\"message\":\"$(message)\"}}";

// Send regId to Notification Hub, so that mobile service uses it when sending Push Message.
             notificationHub.gcm.register(e.regid, null, "any-template-name", template).done(function () {
// This is my function for updating status on view. You can use console.log or any other method.
              app.updateStatus("Registered for new notifications, through Notification Hub");
                        }).fail(function (error) {
               app.updateStatus("error);
                        });
                    }
                }
                break;
// This is handling Push Message
            case 'message':
            // if app is open when notification arrives
                if (e.foreground)
// Perform target action when notification arrives. Again, this my function update view. You can handle it diferently.
                    app.updateStatus(e.payload.message);

                }
                break;

            case 'error':
                app.updateStatus('GCM error: ' + e.message);
                break;

            default:
                app.updateStatus('An unknown GCM event has occurred');
                break;
        }
    }